Creating this serverless blog
In this post I will describe how I created this blog. What technologies I have used, how the site is hosted, why I decided to go with Jekyll, and more.
When I decided that I wanted to start writing on a cloud related blog I started to search for different solutions. Naturally my first choice was Wordpress. Being one of the most, if not the most, used blog engine in the world this just felt natural. I started to deploy everything and within a couple of hours I had everything running. I used an image from AWS marketplace, supplied by Bitnami.
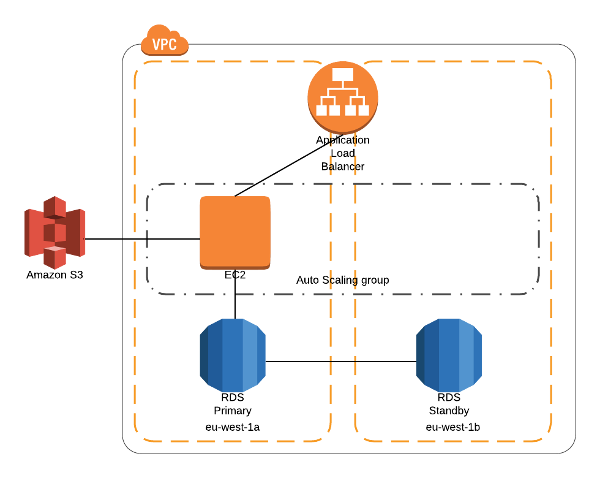
After this setup I had a VPC with public subnets and one EC2 host with Wordpress on it running. This just didn't feel right. One server, with everything on that? That's not good. What if the server dies?
Next step would the be to externalize the database, which I did. Now I had Wordpress running on an EC2 instance and an external database. I used AWS managed database service RDS. I had also extended the VPC to now include both public and private subnets.
Now it was time to get SSL into the picture, I didn't want to run this unencrypted. I was not comfortable with having the SSL key on the EC2 instance, also I wanted to offload this from the instance it self.
OK, let's introduce a loadbalancer then. I moved the EC2 instance to a private subnet in the VPC and deployed a loadbalancer in the public subnet. Now the loadbalancer could offload the ssl encryption and communicate with the EC2 instance, running wordpress over plain old http.
Perfect, or was it? The problem if the server dies still remained. If that happens I wanted it go back online again.
OK, ok. Now I introduced a auto scaling group with a minimum of 1 instance, meaning a new instance would automatically spawn if the one running goes away. Now everything actually looked pretty nice. Good architecture that I could keep building on if I got a lot of readers. The architecture looked like this
 {: .align-center}
Nice right? I was happy. The price for running this would be around $40-50 per month. Not that bad...
But... And now to the big but.
The first thing I had to do after setting things up was to patch. I had to patch Linux, I had to patch Wordpress, I had to path the plugins I used.
Things do evolve and I quickly realized that I would have to put in time managing all of this. Sure I could go with a hosted Wordpress service, but decided not to. I had to make a choice, do I like to managing servers or do I want to use the little time I have to write posts, like this one? :)
Well I like to build stuff, not managing servers. That is why I'm such a huge serverless fan!
I decided it was time to look at other solutions...
Going serverless
I started to look around for a serverless alternative to run this blog on. I investigated and tested many solutions but most of them required some form of servers. Then suddenly I came across Jekyll. This was a blog that works of static webpages. Posts and configurations are made in a markdown syntax. This is then during a transform process transformed into static html files. Jekyll has great support for themes, I decided to go with So Simple.
This I felt that I could work with. Static html files can easily be hosted and served out of AWS in a serverless way.
Time to go and build
It was now time to put my plan into action. Hosting static html files out of AWS can easily be done by setting up webhosting in S3. However S3 don't have support for ssl, the site would then be served over http. I didn't want that, I really wanted ssl support. This is an easy thing to do by serving the page via CloudFront. I would then also gain caching and speed to parts of the world.
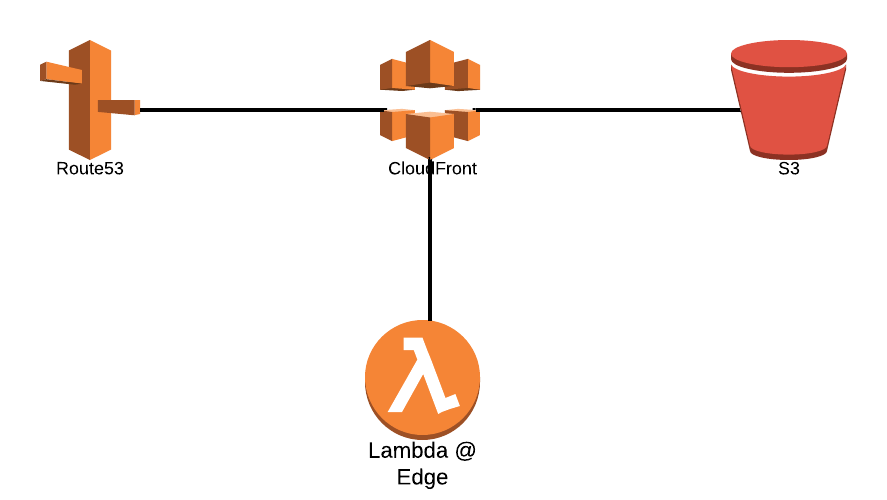
The architecture would look something so simple as this:
 {: .align-center}
Simple right? This would also be very affordable, basically it would cost me nothing if I don't have any traffic.
First security thought
I didn't want the bucket to be accessible by anything else but CloudFront. This can be accomplished by using a CloudFront OriginAccessIdentity and restricting the access to the bucket, using Bucket Policies, to this OriginAccessIdentity.
CloudFormation all the way
If you have read my previous posts you know that I normally use CloudFormation when building my infrastructure and apps. This is not an exception, I will be using CloudFormation when creating the hosting infrastructure. Using infrastructure as code tools, like CloudFormation, makes it possible to create everything over and over again in the same way.
Creating the S3 bucket
First of all we need to create the S3 bucket. I wanted the data to be encrypted, I wanted versioning to be enabled as a backup mechanism, and I wanted old versions if files to be rotated away, so I don't have to pay for that storage.
That would end up in a CloudFormation resources looking something like this.
BlogBucket:
  Type: AWS::S3::Bucket
  Properties:
    BucketEncryption:
      ServerSideEncryptionConfiguration:
        - ServerSideEncryptionByDefault:
            SSEAlgorithm: AES256
    BucketName: !Sub ${ApplicationName}-${Environment}
    LifecycleConfiguration:
      Rules:
        - NoncurrentVersionExpirationInDays: 180
      Status: Enabled
    VersioningConfiguration:
      Status: Enabled
Creating the OriginAccessIdentity
Now it's time to create the OriginAccessIdentity. After that is created I can create a BucketPolicy and restrict access to this specific OriginAccessIdentity, CloudFront would then use this OAI when fetching content. So let's create the OAI then.
OriginAccessIdentity:
  DependsOn: BlogBucket #Make sure this is created after the Bucket
  Type: AWS::CloudFront::CloudFrontOriginAccessIdentity
  Properties:
    CloudFrontOriginAccessIdentityConfig:
      Comment: !Sub ${ApplicationName}-${Environment}-${Comment}
Creating the S3 Bucket Policy
Now we have the S3 bucket and the OriginAccessIdentity. That's all the components that we need to be able to construct a S3 BucketPolicy to restrict access to this OAI.
BlogBucketPolicy:
  Type: AWS::S3::BucketPolicy
  Properties:
    Bucket: !Ref BlogBucket
    PolicyDocument:
      Statement:
      - Action:
        - s3:GetObject
        Effect: "Allow"
        Resource: !Join [ '', [ 'arn:aws:s3:::', !Ref BlogBucket, '/*' ] ]
        Principal:
          CanonicalUser: !GetAtt OriginAccessIdentity.S3CanonicalUserId
Creating the CloudFront distribution
Now we need a way to serve the content from the S3 bucket to you, my readers. This is done via CloudFront, so let's go ahead and create a CloudFront distribution that uses the OAI we created so it can access the content in S3.
CloudFrontDistribution:
  Type: AWS::CloudFront::Distribution
  Properties:
    DistributionConfig:
      Aliases:
        - !Ref DomainName
      Comment: !Sub 'Distribution for the ${ApplicationName} ${Environment}'
      CustomErrorResponses:
        - ErrorCode: 403
          ResponseCode: 200
          ResponsePagePath: '/404.html'
      DefaultCacheBehavior:
        AllowedMethods:
          - 'GET'
          - 'HEAD'
          - 'OPTIONS'
        Compress: False
        DefaultTTL: 0
        MaxTTL: 0
        MinTTL: 0
        ForwardedValues:
          QueryString: False
        TargetOriginId: !Sub ${ApplicationName}-${Environment}-dynamic-s3
        ViewerProtocolPolicy : redirect-to-https
      DefaultRootObject: index.html
      Enabled: True
      Origins:
        - DomainName: !Sub ${ApplicationName}-${Environment}.s3.amazonaws.com
          Id: !Sub ${ApplicationName}-${Environment}-dynamic-s3
          S3OriginConfig:
            OriginAccessIdentity: !Sub origin-access-identity/cloudfront/${OriginAccessIdentity}
      PriceClass: PriceClass_100
      ViewerCertificate:
        AcmCertificateArn: !Ref AcmCertificateArn
        SslSupportMethod: sni-only
Wait a minute.... TTL is set to 0 will that not disable caching?
Actually it will not. What will happen when the TTL is set to 0 is that CloudFront will do a HEAD request to the origin and check the update timestamp of the file. If that match the content is served out of the cache, otherwise CloudFront will fetch the object from the origin before serving it.
Why do a construct like that then?
Basically this will enable more dynamic content. Meaning that the blog can update and that update will be served directly without having to wait for the cache to expire.
Will that not put extra load on the origin then?
No, not really. Since it's only a lightweight HEAD request that is made this have no major impact on the origin.
Route53
Since I don't want you to have to navigate to a strange CloudFront url we need to create a Route53 record. The record will be created as an Alias record. This is a special Route53 extension to DNS.
It's a good approach to use Alias records when targeting AWS resources, such as CloudFront. Route53 would automatically pick up changes to the AWS resource, for example if the IP address of an ELB changes Route53 would identify that and start to respond with this new IP.
We can't set any TTL for Alias records, that is completely handled by AWS and Route53.
Route53Record:
  Type: AWS::Route53::RecordSet
  Properties:
    AliasTarget:
      DNSName: !GetAtt CloudFrontDistribution.DomainName
      HostedZoneId: Z2FDTNDATAQYW2 # CloudFront static value
    Comment: !Sub 'Record for ${ApplicationName}-${Environment}'
    HostedZoneId: !Ref HostedZoneId
    Name: !Sub ${DomainName}.
    Type: A
That was that, or was it?
So that was that, the blog was working perfect? Well not really.
Since CloudFront is not a webserver a url like this: https://blog.dqvist.com/posts/ would lead to CloudFront asking S3 for S3Bucket/posts/ and that key doesn't exists so S3 returns a 403.
Yes, S3 return 403 for keys it can't find and not 404. Basically what that does is make it impossible to scan for files.
Anyway back to our problem that CloudFront is not an webserver and doesn't understand it should ask for S3Bucket/posts/index.html. How should I solve that?
Lambda to the rescue
Sometime I wonder if there is any problem that I can't solve with Lambda?
It's possible to have CloudFront run Lambda functions at the edge location. This should be small and fast functions. I had already built a lambda that made CloudFront act more as a webserver and append index.html to requests like https://blog.dqvist.com/posts/ you can check that out at my GitHub
Now let us create that Lambda and make it run at the edge. As usually I deploy Lambda using SAM.
Function:
  Type: AWS::Serverless::Function
  Properties:
    FunctionName: !Sub ${ApplicationName}-${Environment}-edge-httpserver
    Runtime: nodejs6.10
    MemorySize: 128 # Edge Lambdas can only use 128mb ram
    Timeout: 5 # Edge lambdas can only run for 5seconds
    CodeUri: ../src
    Handler: index_js.handler
    Role: !GetAtt FunctionRole.Arn
And the implementation looks like this.
exports.handler = function (event, context, callback) {
    var request = event.Records[0].cf.request;
    var uri = request.uri
    uri = uri.replace(/\/$/, '\/index.html');
    request.uri = uri
    return callback(null, request);
};
Now there is a need to add the lambda configuration to the CloudFront distribution. This is done by adding LambdaFunctionAssociations to the DistributionConfig section.
CloudFrontDistribution:
  Type: AWS::CloudFront::Distribution
  Properties:
    DistributionConfig:
      .....
        LambdaFunctionAssociations:
            - EventType: origin-request
              LambdaFunctionARN: !Ref LambdaARN
      ....
This will now give us a architecture with the following pattern.
 {: .align-center}
Are we done now?
Now then? Now the blog works perfect? Yes it does!
Everything works like a charm and not one single server to manage.
Mission accomplished!
This only leaves us with how do we update with new posts as effective as possible?
That is a post of it's own actually. Stay tuned it's coming soon :)
