AWS IAM Anywhere
Most of us that have worked with cloud long enough has encountered hybrid cloud solutions in one way or another. I often see clients with some parts, or applications, running on-premises that need to call AWS services. I'm working with an client with an application running on-premises. The application gather data from different sources, and then upload the data files to an Amazon S3 Bucket. The data is imported and analyzed in the cloud. Up till now I needed to create an IAM User and generate long lived credentials that the on-premises part could use. That is until the recent release of IAM Anywhere.
IAM Anywhere
IAM Anywhere rely on Public key Infrastructure (PKI) and exchange x.509 certificates for temporary AWS IAM credentials. You establish a trust between you AWS account and a Certificate Authority (CA), a trust anchor. Certificates issued by that CA can then be used to get credentials. Fields, like the Common Name (CN), in the certificate can be used as conditions in policies to limit what IAM Roles that can be assumed.
WARNING
Using a public CA like Let's Encrypt might seem like an easy way to set this up. However, if Let's Encrypt is registered as the trust anchor ALL certs issued by Let's Encrypt will be trusted, not only your. Even though you can use policy constraints to limit to your own certs be aware that this might be dangerous.
Certificate Requirements
There are some requirements on the CA and client certificates that we use for IAM Anywhere.
CA (Trust Anchor)
- Must be in PEM format
- Must be version 3
- Basic constraints must include CA: TRUE
Client Certificates
- Must be version 3 (X.509v3)
- Basic constraints must include CA: FALSE
- Key usage must inclue Digital Signature
- Signing algorithm must include SHA256 or stronger.
This is good to keep in mind since the error messages that are produced are not that informative and it took some deep investigations to figure out what was wrong.
Fetching credentials
When requesting credentials the request must be signed using normal SigV4, like with all AWS calls. The signing process is a bit tedious and is described here. Then a Session need to be created, according to this process.
I found that this process was not that straight forward, luckily AWS has released a helper for it.
aws_signing_helper
The aws_signing_helper is a tool that will help with the process to obtain temporary credentials. I found the tool to be really easy and nice to use. You need to specify the certificate, private key, trust anchor, profile, and role, the tool will sign and obtain credentials.
./aws_signing_helper credential-process \
    --certificate <path to cert> \
    --private-key <path to private key> \
    --trust-anchor-arn <trust anchot arn> \
    --profile-arn <profile arn> \
    --role-arn <role arn>
That call will generate a response like this.
{
	"Version": 1,
	"AccessKeyId": "ASIATRR....",
	"SecretAccessKey": "MKFbQPsMntcK7qaNa.....",
	"SessionToken": "IQoJb3JpZ2luX2VjEC0aCWV1LXdlc3QtArXGEWjEAui1jQES0v.....=",
	"Expiration": "2022-07-23T13:26:39Z"
}
What is really good is that you can specify the credentials process in the AWS credentials config. You add a section to the config like this.
[profile cert-test]
credential_process = aws_signing_helper credential-process --certificate <cert path> /
--private-key <private key> --trust-anchor-arn <trust anchor arn> /
--profile-arn <profile arn> --role-arn <role arn>
Then it's as easy ass calling the CLI directly using that profile.
aws s3 ls --profile cert-testDemo
Let's now setup IAM Anywhere with our own self signed CA and certificate, I will be using OpenSSL to generate everything that we need.
Create CA
Firts of all we need to create our CA that we then use to sign our certificates. Before we start make sure you have the v3_ca part in your openssl.cnf file. Since we will use this to add version 3 extension. It should look like this.
[ v3_ca ]
basicConstraints        = critical, CA:TRUE
subjectKeyIdentifier    = hash
authorityKeyIdentifier  = keyid:always, issuer:always
keyUsage                = critical, cRLSign, digitalSignature, keyCertSign
Next we generate our private key and the CA pem file with commands.
openssl genrsa -out PrivateCA.key 4096
openssl req -new -x509 -days 3650 -key PrivateCA.key -out PrivateCA.pem -extensions v3_ca
Let's validate that we have version 3 CA with command.
openssl x509 -text -noout -in PrivateCA.pem We can then create the client certificates that we will use to obtain credentials. Once again we MUST have the version 3 extensions present in the certificate, and since extensions are not transfered from a CSR to the cert automatically, du to security, by OpenSSL I needed to create an extensions file that I used in the signing process. I created a file named v3.ext with this content.
# v3.ext
authorityKeyIdentifier=keyid,issuer
basicConstraints=CA:FALSE
keyUsage = digitalSignature, nonRepudiation, keyEncipherment, dataEncipherment
With this in place it's a three step process to create the client certificate.
openssl genrsa -out client.key 4096
openssl req -new -key client.key -out client.csr
openssl x509 -req -in client.csr -CA PrivateCA.pem -CAkey PrivateCA.key -set_serial 01 -out client.pem -days 3650 -sha256 -extfile v3.ext
Now we should have 5 files in our directory.
PrivateCA.key
PrivateCA.pem
client.key
client.csr
client.pem
Create Trust Anchor
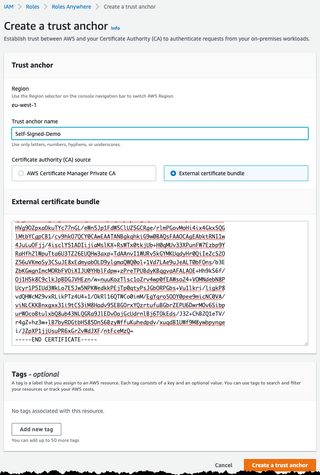
Let's head over to the AWS console and the IAM part. Navigate to Roles and click on IAM Anywhere in the bottom. Then click on Create a trust anchor
Give the Trust Anchor a name, and select External certificate bundle in the External certificate bundle paste the content from PrivateCA.pem

Create IAM Role
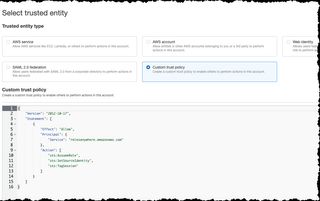
We need an IAM Role that Trust iamanywhere, so we can assume this role and obtain credentials. We create this as normal IAM Role with a trust policy like this
{
    "Version": "2012-10-17",
    "Statement": [
        {
            "Effect": "Allow",
            "Principal": {
                "Service": "rolesanywhere.amazonaws.com"
            },
            "Action": [
                "sts:AssumeRole",
                "sts:SetSourceIdentity",
                "sts:TagSession"
            ]
        }
    ]
}
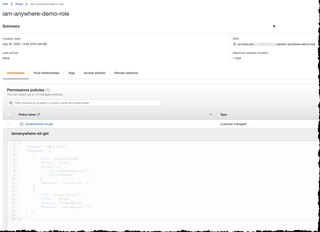
Set the IAM Policy for the role, with minimal permissions, like this
{
    "Version": "2012-10-17",
    "Statement": [
        {
            "Effect": "Allow",
            "Action": [
                "s3:ListAllMyBuckets"
                "s3:ListBucketVersions",
                "s3:ListBucket"
            ],
            "Resource": "arn:aws:s3:::*"
        },
        {
            "Effect": "Allow",
            "Action": "s3:GetObject",
            "Resource": "arn:aws:s3:::*/*"
        }
    ]
}
Create a Profile
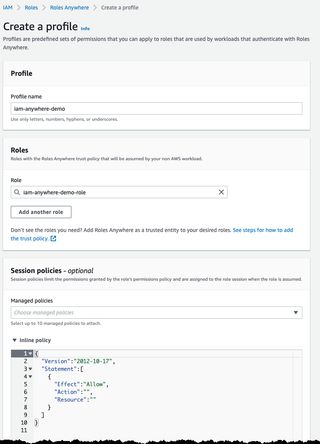
Now head back to IAM Anywhere and create a profile, this is what we use when obtaining credentials. Give it a name and assign the IAM Role that we created in previous step.

The session policy can be used to scope down who can obtain credentials for the profile, we could e.g. only allow certain IP address:es or we can use fields in the certificate like the CN.
{
    "Version": "2012-10-17",
    "Statement": [
        {
            "Effect": "Allow",
            "Action": "*",
            "Resource": "*",
            "Condition": {
              "IpAddress": {
                  "aws:SourceIP": "1.2.3.4"
                }
            }
        }
    ]
}
{
.....
"Condition": {
"StringEquals": {
"aws:PrincipalTag/x509Subject/CN": "Bob"
}
}
.....
}In the demo I just allow everthing.
Obtain Credentials
With that we can start using the aws_signing_helper to get credentials, as shown before we run the command below to get credentials.
./aws_signing_helper credential-process \
    --certificate client.pem \
    --private-key client.key \
    --trust-anchor-arn arn:aws:rolesanywhere:eu-west-1:12345678:trust-anchor/bdb3b3cf-013c-448b \
    --profile-arn arn:aws:rolesanywhere:eu-west-1:12345678:profile/58e35304-c092-470a \
    --role-arn arn:aws:iam::12345678:role/iam-anywhere-demo-role
Or we just add it to our AWS config file
[profile cert-test]
credential_process = ./aws_signing_helper credential-process \
    --certificate client.pem \
    --private-key client.key \
    --trust-anchor-arn arn:aws:rolesanywhere:eu-west-1:12345678:trust-anchor/bdb3b3cf-013c-448b \
    --profile-arn arn:aws:rolesanywhere:eu-west-1:12345678:profile/58e35304-c092-470a \
    --role-arn arn:aws:iam::12345678:role/iam-anywhere-demo-role
With that we can now run CLI commands towards AWS without having long lived credentials stored on local machine.
Conclusion
I must say that IAM Anywhere is one of those features that I have not been missing but now when it exists I can't see living without. It removes the need to create IAM Users and long lived credentials for local, on-premises, services that need to call AWS. Using x.509 certificates and our company private CA create a strong and secure mechanism for obtaining short lived credentials. If your company don't have its own Private CA it's possible to use a Private CA from AWS ACM, sure that come with additional cost but I would say it's worth the money.
I have only been playing around with IAM Anywhere for a couple of hours and I'm alredy loving it. Next task would be to update the access pattern with all my clients that currently uise long lived credentials. This will be a migration process that hopefulle will not be too hard to perorm.
As I see it, IAM Anywhere is a game changer and will make thing easier and more secure!
Final Words
Don't forget to follow me on Twitter, and LinkedIn for more content, and read rest of my Blogs
