Secure your API Gateway APIs with Lambda Authorizer
This will be the third post in the series about AWS API Gateway an authorization. In my last two posts we have discussed hos to use Auth0 and JWT Authorizer with API Gateway and Mutual TLS to Authorize calls to API Gateway. In this post we will explore the use of custom Lambda Authorization. Why would we like to use custom Lambda baked Authorizer and not any of the built in out of the box authorizer? There can be many reasons for why you need to implement a custom authorizer, one is that you need to create a service to service integration and you need to use a shared secret. In this case you need to use a Lambda Authorizer. This is the scenario we will use in this post as we setup the authorization.
I will use the console and CLI to do the entire setup. As normal everything exists as CloudFormation and is available on GitHub
Request payload
When working with API Gateway HTTP API the default version is 2.0, version 1.0 can be used to be backward compatible with a API Gateway REST API.
Request format, 2.0
{
"version": "2.0",
"type": "REQUEST",
"routeArn": "arn:aws:execute-api:us-east-1:123456789012:abcdef123/test/GET/request",
"identitySource": ["user1", "123"],
"routeKey": "$default",
"rawPath": "/my/path",
"rawQueryString": "parameter1=value1¶meter1=value2¶meter2=value",
"cookies": ["cookie1", "cookie2"],
"headers": {
"Header1": "value1",
"Header2": "value2"
},
"queryStringParameters": {
"parameter1": "value1,value2",
"parameter2": "value"
},
"requestContext": {
"accountId": "123456789012",
"apiId": "api-id",
"authentication": {
"clientCert": {
"clientCertPem": "CERT_CONTENT",
"subjectDN": "www.example.com",
"issuerDN": "Example issuer",
"serialNumber": "a1:a1:a1:a1:a1:a1:a1:a1:a1:a1:a1:a1:a1:a1:a1:a1",
"validity": {
"notBefore": "May 28 12:30:02 2019 GMT",
"notAfter": "Aug 5 09:36:04 2021 GMT"
}
}
},
"domainName": "id.execute-api.us-east-1.amazonaws.com",
"domainPrefix": "id",
"http": {
"method": "POST",
"path": "/my/path",
"protocol": "HTTP/1.1",
"sourceIp": "IP",
"userAgent": "agent"
},
"requestId": "id",
"routeKey": "$default",
"stage": "$default",
"time": "12/Mar/2020:19:03:58 +0000",
"timeEpoch": 1583348638390
},
"pathParameters": { "parameter1": "value1" },
"stageVariables": { "stageVariable1": "value1", "stageVariable2": "value2" }
}
We have data from header,context, request path, and several other fields available to work with. What we don't have is the request body payload. This is probably due to the potential large amount of data that can be in the body. However it would be nice to be able to specify some data and fields from the body to be available, but for now this is what we have to work with.
Response format
We can return our response in two different ways. We can either use the Simple or IAM response. In this post we will mainly use the simple format.
Simple Response
The simple format is the easiest to use but it also gives you less control. The response is a boolean value indicating if the user is authorized or not and an optional context object that will be made available to our Lambda integrations.
{
  "isAuthorized": true/false,
  "context": {
    "exampleKey": "exampleValue"
  }
}
IAM Response
The IAM response is basically an IAM policy allowing or denying the request.
{
  "principalId": "abcdef",
  "policyDocument": {
    "Version": "2012-10-17",
    "Statement": [
      {
        "Action": "execute-api:Invoke",
        "Effect": "Allow|Deny",
        "Resource": "arn:aws:execute-api:{regionId}:{accountId}:{apiId}/{stage}/{httpVerb}/[{resource}/[{child-resources}]]"
      }
    ]
  },
  "context": {
    "exampleKey": "exampleValue"
  }
}
Context data
The data that we return in the context object are available in mapping templates and will also be available to our Lambda function. The data can also be used for advanced access logging. We could add signed user data that we can trust in our Lambda integrations, this way our backend would not need to look up the user information every time.
In the Lambda function the context data is accessed via the requestContext and authorizer fields.
"requestContext": {
    "authorizer": {
        "lambda": {
            "exampleKey": "exampleValue"
        }
     }
}
Create the Lambda Authorizer Function
With the short walk through of the request, response, and context we can start to create the Lambda Function that will act as our custom Lambda authorizer.
To make it a bit more secure, and not only check a shared secret we will make a HMAC digest that we will use. The caller of the API will calculate the HMAC digest using the shared secret and our Lambda function will do the same calculation and compare. We will use the called url, including parameters, when calculating the digest, it will then be Base64 encoded and added to the authorization header by the caller. The code to create the Base64 encoded secret looks like this.
def make_digest(message, key):

    key = bytes(key, 'UTF-8')
    message = bytes(message, 'UTF-8')

    hmac_digester = hmac.new(key, message, hashlib.sha1)
    digest = hmac_digester.digest()

    return str(base64.urlsafe_b64encode(digest), 'UTF-8')
In the handler we read out the url, request path, and request parameters to create the full string that should be signed. As an example we use a static string as our key, in production we should read this from secrets manager. Our full Lambda code looks like this.
import hashlib
import hmac
import base64

SHARED_SECRET_KEY = 'Th1sI$A$uperS3cretK3y'

def lambda_handler(event, context):

    raw_path = event['rawPath']
    if 'rawQueryString' in event:
        raw_query_string = event['rawQueryString']
    domain_name = event['requestContext']['domainName']

    url = f"https://{domain_name}{raw_path}"

    if raw_query_string:
        url = f"{url}?{raw_query_string}"

    digest = make_digest(url, SHARED_SECRET_KEY)

    return {
        "isAuthorized": event['headers']['authorization'] == digest,
        "context": {
            "exampleKey": "exampleValue",
        }
    }

def make_digest(message, key):

    key = bytes(key, 'UTF-8')
    message = bytes(message, 'UTF-8')

    hmac_digester = hmac.new(key, message, hashlib.sha1)
    digest = hmac_digester.digest()

    return str(base64.urlsafe_b64encode(digest), 'UTF-8')
Create API Gateway & Lambda
Now the time has come to create a Lambda function to use as target, an API Gateway, and configure the authentication.
Create the Lambda function
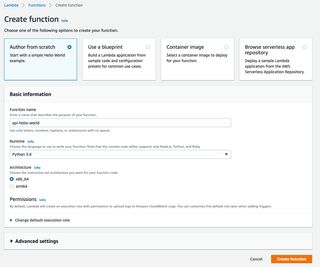
Jump into the Lambda part of the console and start authoring a function from scratch. Name the function api-hello-world, set the runtime to python 3.8, leave rest as default anc click Create Function
In the next step update the code and hit Deploy
import json

def lambda_handler(event, context):

    print("Hello world from Lambda!")

    return {
        'statusCode': 200,
        'body': json.dumps('Hello World!')
    }
Create API Gateway
Time to start setting up API Gateway. Navigate to API gateway part of the console and click Create API. In the selection screen click Build for the HTTP API.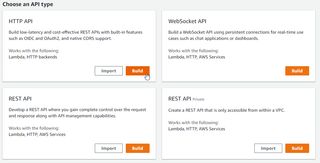
We create one integration for the Lambda function and name the API, I will call mine api-hello-world and click Next.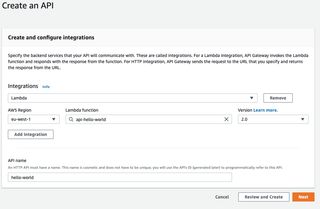
Now we need to configure the route. Set the method to GET and add a resource path, point the route to the corresponding integration.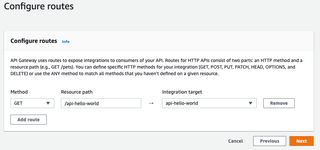
Move on to the next part of the configuration, to setup the stages. You can leave this with default settings with a $default stage with auto-deploy on.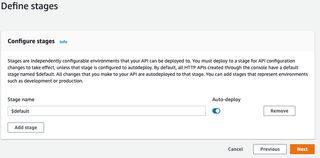
Final step is to review and create the API. Your configuration should look something like this. Click Create to create the API.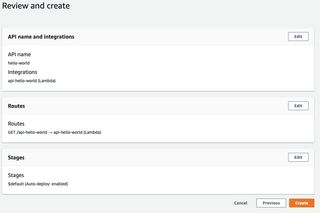
Now let's test it all out before moving to the next part of the configuration. Select you newly created API and find the Invoke URL. Copy and paste the URL into a browser and don't forget to add the resources path, e.g. /api-hello-world if everything is working you should now see result in the browser window.
Configure Authentication
Navigate to API Gateway in the console and select the API we just created. Click on Authorization in the menu to the left and then select Manage authorizers tab.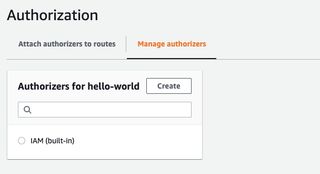
Click on the Create button. Select the type as Lambda and select the Lambda function we created to use as Authorizer. You can keep the rest of the settings as default.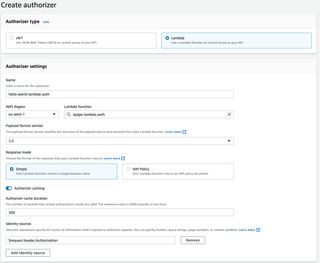
One important part is to Automatically grant API Gateway invocation permissions on the Lambda function.
The final step is not to attach the created authorizer to your API method. So select the Attach authorizers to routes tab. For the GET select the Lambda function in the drop down and click Attach Authorizer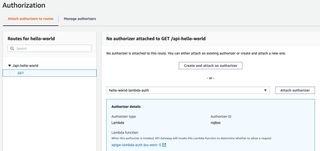
When this is done the config should look like this.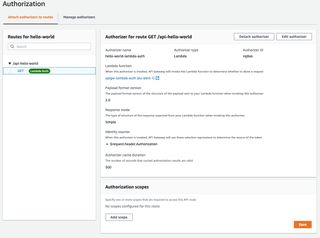
Once again let's test it all out. Select your created API and find the Invoke URL. Copy and paste the URL into a browser and don't forget to add the resources path, e.g. /api-hello-world you should now see an Access denied message.
Add the authentication string to the http Authentication header and you should once again see Hello World message. You can tweak the Lambda function to allow basically anything in the Header for easier testing.
Caching
It's possible to turn on caching and not have API gateway call the Lambda function every time. Unless you really must check every call caching is a good option to speed up results and reduce the number of invocations. To enable caching specify the authorizerResultTtlInSeconds. Since we in this example are using simple responses, the authorizer's response fully allows or denies all API requests that match the cache, we must turn to IAM to have a more granular allow deny.
Final wrap up
Now we have an API setup using a Lambda function for authentication. There are several reasons for using a Lambda function for authentication, one is service-2-service or machine-2-machine integration where a shared secret is the only option for authentication. Other use-cases are that you need to do some custom logic, fetch data from a database, check users access rights and other things like that.
Series
This was the third post in the series on how to setup different Authentication and Authorization on API gateway. Don't miss my previous post about Auth0 and built in JWT Authorizer. and Mutual TLS to Authorize calls to API Gateway
