Extending My Blog with Translations by Amazon Nova

Are you reading this post in English? Or maybe Spanish? Or why not Italian?
In my previous post about automating tasks for my blog, I added automated proofreading using Amazon Nova. While writing in English allows me to connect with a large technical audience, there's an even larger global community that could benefit from my content if it were available in their native languages.
I've previously extended my blog with voice generation using Amazon Polly. I did that so people struggling with reading, such as those with dyslexia, could learn from my content without struggling to read, and instead listen to it.
This time, I'm breaking down language barriers and making my technical content accessible to developers and cloud enthusiasts around the world through automated translation using Amazon Nova.
Vision
The technical community is incredibly diverse, and while English is mostly used in the tech world, far from everyone is a native English speaker. I'm not, and far from everyone is 100% comfortable consuming content in English. They prefer to read it in their native language. Complex technical concepts can be challenging enough without the additional barrier of language comprehension.
In my post Serverless statistics solution with Lambda@Edge, I explain how I built a serverless analytics system for my blog, where I could see where my readers are from, and more.
Looking at my analytics, I can see a lot of readers from Germany, Austria, France, Italy, Spain (and other Spanish-speaking countries), and Brazil and Portugal. I therefore wanted to create a solution where people could choose if they like to read in English or in a different language.
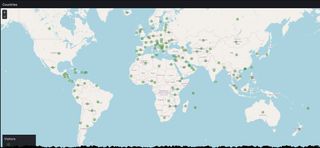
For this first implementation of a translation service, I chose to support five languages that represent a large portion of my readers: German, Spanish, French, Italian, and Portuguese. I might add additional languages such as Japanese in a second phase.
What was important is that the solution would:
Maintain technical accuracy: Technical terms and AWS service names need to be translated correctly.
Preserve markdown structure: All formatting, code blocks, links, and images must remain intact.
Keep my writing style: The translation should feel natural while maintaining the technical depth.
Scale efficiently: Support multiple languages without multiplying my workload.
Integrate seamlessly: Fit into my existing serverless and event-driven pipeline.
Amazon Nova for Translation
Having successfully used Amazon Nova Pro for proofreading, I was sure it would be able to handle my translation tasks as well. Nova Pro's multimodal capabilities and understanding of context make it well-suited for translating technical content. You can read more about Nova, different models, and BedRock in my post automated proofreading using Amazon Nova.
Solution Architecture
Building on my existing event-driven architecture, I extended the pipeline to include the translation. When I created the pipeline, I built it in a very modular way, so it could easily be extended. This approach really pays off now as I can plug in extensions seamlessly into the same flow with very little effort.
The translations run in parallel with the generation of voice and quiz in case of running a pull request. However, I decided to separate it from the standard saga flow that I use for the voice and quiz. The reason for that is that I would like to be able to run the translations not only on pull requests, but also invoke translations of older posts.
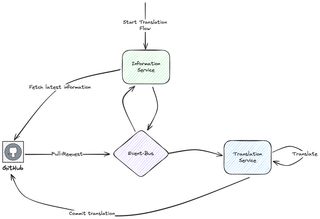
So in case of the pull request context, the flow starts when proofreading is done, by an event from GitHub Actions. But I can also invoke and start the flow by sending an event with a branch name and the blog to translate, to the information service that then starts the entire flow. One addition in that case is that in one last step, I will also open a new pull request with the translations for the old post.
The translations are stored in language-specific directories (e.g., /de/, /es/, /fr/), which enables me to organize everything during the build process. I use 11ty to generate static HTML from my posts written in markdown.
Technical Deep Dive
The translation is implemented as its own service and is based on Step Functions as the main service and orchestrator. The translation starts either with me creating a new branch and starting the flow for an older post, or it's automatically started when a new pull request is opened, for a new post. Creating a translation flow like this.
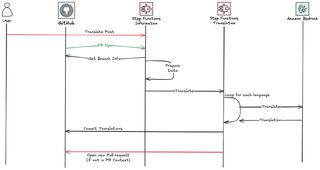
Translation Step Function
The core of the translation service is this Step Function, which orchestrates the entire flow. If you have followed me for a while, you know that I normally try to use Step Functions SDK integrations as much as possible, but for the translation flow, I need to rely heavily on my second favorite service, Lambda.
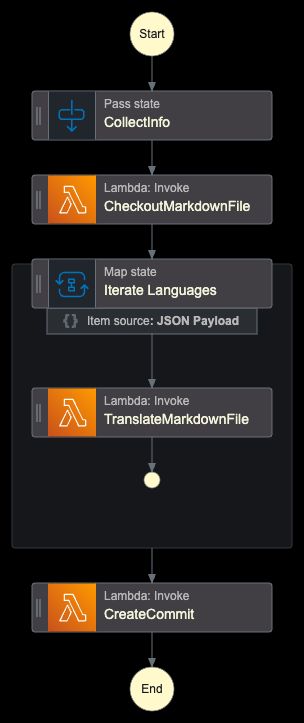
The workflow consists of several key states:
- CollectInfo: Normalizes input data and prepares for translations, reads languages from the event or uses default.
- CheckoutMarkdownFile: Downloads the source markdown file from GitHub.
- Iterate Languages: Runs translations for the target languages, limited to 1 parallel translation at the moment.
- CreateCommit: Commits all translated files back to the repository, opens a new pull request if needed.
Looking at the definition for the Step Function, I'm using the support for JSONata query language, which is one of the best additions to Step Functions together with variables. The CollectInfo state will store information in variables that are available for all future states. Iterating over languages, I'm using a Map state with a limit set to 1.
Comment: Translate post content using Bedrock.
QueryLanguage: JSONata
StartAt: CollectInfo
States:
  CollectInfo:
    Type: Pass
    Assign:
      Languages: "{% $exists($states.input.detail.Data.Translate.Languages) ? $states.input.detail.Data.Translate.Languages : ['de','es','fr','it','pt'] %}"
      GitInfo:
        CommitSha: "{% $exists($states.input.detail.Data.GitInfo.CommitSha) ? $states.input.detail.Data.GitInfo.CommitSha : $states.input.detail.Data.PullRequestInfo.PullRequestCommitSha %}"
        Branch: "{% $exists($states.input.detail.Data.GitInfo.Branch) ? $states.input.detail.Data.GitInfo.Branch : $states.input.detail.Data.PullRequestInfo.PullRequestBranch %}"
      MarkdownInfo:
        FilePath: "{% $states.input.detail.Data.MarkdownFile.path %}"
        FileSlug: "{% $states.input.detail.Data.MarkdownFile.fileSlug %}"
    Next: CheckoutMarkdownFile
  CheckoutMarkdownFile:
    Type: Task
    Resource: arn:aws:states:::lambda:invoke
    Arguments:
      FunctionName: ${CheckoutMarkdownFileFunctionArn}
      Payload:
        GitInfo: "{% $GitInfo %}"
        MarkdownInfo: "{% $MarkdownInfo %}"
    Next: Iterate Languages
  Iterate Languages:
    Type: Map
    ItemProcessor:
      ProcessorConfig:
        Mode: INLINE
      StartAt: TranslateMarkdownFile
      States:
        TranslateMarkdownFile:
          Type: Task
          Resource: arn:aws:states:::lambda:invoke
          Arguments:
            FunctionName: ${TranslateBedrockFunctionArn}
            Payload:
              Key: "{%$MarkdownInfo.FileSlug & '/' & $MarkdownInfo.FilePath %}"
              S3Bucket: ${ETLBucket}
              Language: "{% $states.input %}"
          End: true
    Next: CreateCommit
    MaxConcurrency: 1
    Items: "{% $Languages %}"
  CreateCommit:
    Type: Task
    Resource: arn:aws:states:::lambda:invoke
    Arguments:
      FunctionName: ${CreateCommitFunctionArn}
      Payload:
        GitInfo: "{% $GitInfo %}"
        MarkdownInfo: "{% $MarkdownInfo %}"
    End: true
Lambda Functions
Looking at the Lambda functions, there are three main functions in play in the solution. The function that will use Octokit to checkout the code, and the function that will create the new commit. Both of these have been explained in previous posts on this topic, and are left out this time.
Translation Function
This is the heart and soul of the entire solution and will interact with Bedrock to translate the post. The translated post will be stored in a language-specific directory.
import json
import os
import boto3
from botocore.exceptions import ClientError

def handler(event, context):
    try:
        bucket = event.get("S3Bucket")
        key = event.get("Key")
        lang = event.get("Language", "error")

        if lang not in ["de", "es", "fr", "it", "pt"]:
            raise ValueError(
                f"Unsupported language '{lang}'. Supported languages are: de, es, fr, it, pt."
            )

        s3_client = boto3.client("s3")
        bedrock_client = boto3.client("bedrock-runtime", region_name="eu-west-1")

        response = s3_client.get_object(Bucket=bucket, Key=key)
        file_content = response["Body"].read().decode("utf-8")

        prompt = f"""You are a professional technical editor and translator, expert in AWS and Cloud computing. Please carefully translate the following markdown blog post to {lang}.
        Instructions:
        - Maintain the original markdown formatting
        - Keep the tone and style consistent
        - Do not change the meaning or structure of the content
        - Return only the translated markdown text without any additional commentary
        - Do not translate any code blocks or inline code
        - Ensure proper grammar, spelling, and punctuation
        - If the content is already in {lang}, just ignore it and return the content as is
        - Do not surround the translated version with ```markdown

        Here is the markdown content to translate:

        {file_content}"""

        # Prepare the request for Nova Pro model
        request_body = {
            "messages": [{"role": "user", "content": [{"text": prompt}]}],
            "inferenceConfig": {
                "temperature": 0.1,  # Low temperature for consistent translations
                "topP": 0.9,
                "maxTokens": 10240,  # Adjust based on expected output length
            },
        }

        bedrock_response = bedrock_client.invoke_model(
            modelId="eu.amazon.nova-pro-v1:0",
            body=json.dumps(request_body),
            contentType="application/json",
        )

        response_body = json.loads(bedrock_response["body"].read())
        translated_content = response_body["output"]["message"]["content"][0]["text"]

        new_key = f"{lang}/{key}"

        s3_client.put_object(
            Bucket=bucket,
            Key=new_key,
            Body=translated_content.encode("utf-8"),
            ContentType="text/markdown",
        )

        return {
            "statusCode": 200,
            "body": "Translation done",
        }

    except Exception as e:
        print(f"Unexpected error: {str(e)}")
        return {
            "statusCode": 500,
            "body": json.dumps({"error": "Internal Server Error", "message": str(e)}),
        }
Translation Quality and Prompt Engineering
During the implementation of the proofreading solution, I learned how important the prompt engineering part was for the end result. The AI still does just what you tell it to do, and if your prompt is not specific enough, the quality of the result can vary. Using the learnings from proofreading, my prompt included some specific requirements.
In the end, the following prompt gave me some great results:
You are a professional technical editor and translator, expert in AWS and Cloud computing.
Please carefully translate the following markdown blog post to {lang}.
Instructions:
- Maintain the original markdown formatting
- Keep the tone and style consistent
- Do not change the meaning or structure of the content
- Return only the translated markdown text without any additional commentary
- Do not translate any code blocks or inline code
- Ensure proper grammar, spelling, and punctuation
- If the content is already in {lang}, just ignore it and return the content as is
- Do not surround the translated version with ```markdown

Here is the markdown content to translate:
11ty Changes
I'm using 11ty as the static HTML generator, all blogs are written in markdown and then converted to HTML. To be able to support different languages, I needed to make some changes to my 11ty build and layout. First of all, I added a new field to the front matter that indicates what language the post is in. Then I needed to change how my post collection was fetching blog posts.
I added a filter so I only fetch the posts in English so I don't get all posts in the collection.
export default (coll) => {
  const posts = coll
    .getFilteredByGlob("src/posts/*.md")
    .filter((p) => (p.data.lang || "en") === "en");

  return posts.reverse();
};
Next, I needed to locate all translations for a post. I used the file slug as the key to create this collection.
config.addCollection("postsBySlug", (collection) => {
  const posts = collection.getFilteredByGlob("src/posts/**/*.md");
  const postsBySlug = {};

  posts.forEach((post) => {
    const pathParts = post.inputPath.split("/");
    const filename = pathParts[pathParts.length - 1];
    const baseSlug = filename.replace(".md", "");

    if (!postsBySlug[baseSlug]) {
      postsBySlug[baseSlug] = [];
    }
    postsBySlug[baseSlug].push(post);
  });

  return postsBySlug;
});
With this in place, I could create and include a language indicator that would add flags indicating translations to the post grid. Where each flag is clickable and would take you directly to the translated post.
{% set item = post or talk %}
{% set pathParts = item.inputPath.split('/') %}
{% set filename = pathParts[pathParts.length - 1] %}
{% set baseSlug = filename.replace('.md', '') %}
{% set currentLang = item.data.lang or 'en' %}

{# Only show language indicator for posts (not talks or links) #}
{% if item.inputPath.includes('/posts/') %}
{% set availablePosts = collections.postsBySlug[baseSlug] %}
{% if availablePosts.length > 1 %}
<div class="mx-auto flex items-center flex-wrap">
    <div class="justify-start items-center flex-grow w-full md:w-auto md:flex">
        <p class="text-gray-700 mb-1 font-medium" title="Available languages">
            <i class="fas fa-globe text-teal-600 fill-current"></i>
            {% for translatedPost in availablePosts %}
                {% set postLang = translatedPost.data.lang or 'en' %}
                <a href="{{ translatedPost.url }}" class="text-sm ml-1 hover:scale-110 transition-transform duration-200 inline-block" title="{{ postLang | getLanguageName }}">{{ postLang | getLanguageFlag }}</a>
            {% endfor %}
        </p>
    </div>
</div>
{% endif %}
{% endif %}
Resulting in:
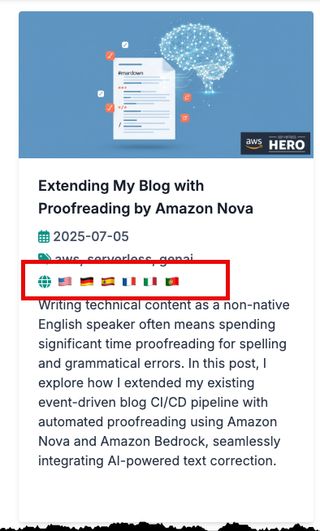
Finally, I added a drop-down menu to the actual post layout together with a disclaimer that the post was translated by an AI.
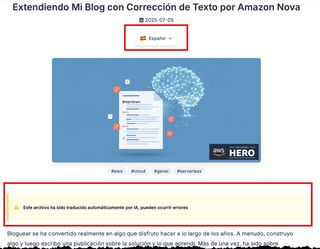
With these changes, you can select what language you like to read each post in.
Conclusion
Adding automated translation to my blog felt like the next step in making my content available for everyone. By leveraging Amazon Nova Pro and my existing serverless architecture, I've created a scalable translation solution without adding operational complexity. Whether you're building a technical blog, documentation, or any content platform, automated translation could expand your reach.
Why didn't I translate the entire site? This was a route I first explored, but I felt that the main benefit would be in having the posts translated. It also gives me the freedom to decide if I like to translate all older posts or not, and I can add translations afterward. One day I might translate everything, but right now the focus was on posts individually.
Final Words
Don't forget to follow me on LinkedIn and for more content, read the rest of my Blogs.
As Werner says! Now Go Build!
This post was originally written in English and automatically translated into multiple languages using the very system described here. The translation process took less than 5 minutes and required zero manual intervention.
